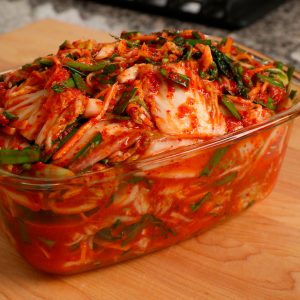
Kimchi Homemade recipe !!!
A quick and easy recipe for authentic Kimchi, full of healthy probiotics that will keep for months in the fridge. Easy, flavorful and adaptable! Vegan adaptable!
Ingrédients
- 2 pounds napa cabbage, cored and cut into 1-inch pieces (one large cabbage) you can use other kind of cabbages
- ¼ cup sea salt (60 grams)
- 2 cups radish, cut into matchstick strips (optional, or use carrots)
- 1 bunch scallions, trimmed and cut into 1-inch pieces
- 1 tablespoon fresh ginger, sliced ( 2-3 disks, peels ok)
- 6 cloves garlic, whole
- 1 shallot, quartered (optional)
- 2–6 tablespoons Korean-style red pepper flakes (gochugaru) if you don't find gochugaru pepper on market you can use also replace it with red ground cayenne pepper
- 2 tablespoons of soy sauce
- 2 teaspoons sugar ( or an alternative like honey, brown rice syrup)
- 1 tablespoon glutenous rice powder optional
Instructions
- SALT THE CABBAGE (6-8 hours): Reserve 1-2 outer leaves of the napa cabbage and refrigerate for later use (wrap in plastic). Cut the remaining cabbage and place it in a large bowl with the salt and toss. Add enough cool water to cover the cabbage and stir until salt is dissolved. Keep the cabbage submerged with a plate over the bowl and let stand at room temperature 6-8 hours (giving a stir midway through if possible) or overnight.
- Drain the cabbage, saving the brine. Rinse the cabbage (not excessively, just a little quick rinse), drain, squeeze out any excess water, or blot with paper towels, and place it back in the bowl, adding the daikon radish and scallions.
- Make the PASTE: Place the ginger, garlic, shallot, red pepper flakes, fish sauce (or alternatives) and sugar in your food processor. Add optional rice powder (see notes!) Process until well combined, pulsing, until it becomes a thick paste.
- Scoop the paste over the cabbage and using tongs or gloves, mix and massage the vegetables and the red pepper mixture together really well, until well coated.
- PACK the cabbage into a large, two-quart jar (or two, quart jars) or a crock, leaving 1-2 inches room at the top for juices to release. Add a little of the reserved brine to just cover the vegetables, pressing them down a bit ( so they are submerged) Place the whole cabbage leaf over top, pressing down- this should help keep the kimchi submerged under the brine. You can also use a fermentation weight placed over top of the whole leaf to keep it submerged. Or a small zip lock filled with water. Basically anything that touches air may mold – but no worries if this happens (see notes) it is not ruined.
- FERMENT (3-4 days) Cover loosely with a lid (allowing air to escape) and place the jar in a baking dish (or big bowl) to collect any juices that may escape. (The idea though, is to keep as much of the flavorful juice in the jar, so don’t overfill.) Leave this somewhere dark and cool (55F-65F is ideal) for 3 days. A basement or lower cooler cabinet in the pantry or kitchen away from appliances works best.
- EVENING OF DAY 3: Check for fermentation action or bubbles. Tap the jar and see if tiny bubbles rise to the top. Check for overflow (which also indicates fermentation). If you see bubbles, it is ready to store in the refrigerator where it will continue to ferment and develop more flavor slowly. For a softer tangier kimchi, you can continue to ferment for 3 more days or longer. If no action, give it another day or two. If you don’t see bubbles when tapping the jar, it just may need a couple more days- especially in cooler climates. Be patient. See the troubleshooting section below.
- REFRIGERATE: After you see bubbles (usually 3-5 days) the kimchi is ready, but it won’t achieve its full flavor and complexity, until about 2 weeks (in the fridge) slowly fermenting. The longer you ferment, the more complex and tangy the taste. If you like a fizzy brine, tighten the lid, burping every week or so. If you don’t want to think about it, give the lid one loose twist, so it’s on there, but gases can escape.
- This will keep for months on end in the fridge (as long as it is submerged in the brine) and will continue to ferment very slowly, getting more and more flavorful. Feel free to remove the cabbage leaf and just press kimchi down under the brine, after each use. ( See notes for adding more brine.)
Notes
Instructions Tips !
- If you like your kimchi, thick, and less watery, you can use sweet glutenous rice powder to thicken. This is not the same as rice flour! Cook 1 tablespoon glutenous rice powder with ½ cup water, in a small pot over medium heat, stirring constantly until it boils. Let cool, still whisking occasionally. Add to the chili paste in the food processor. Continue with recipe.
- BRINE If you need or want to add more salt brine to the kimchi, to keep it submerged, mix water and salt at this ratio: 1 cup water and 1 1/4 teaspoon fine sea salt. Stir it together first, pour over the kimchi.